タダです.
AWS の IAM ロールとポリシーがどのような関係になっているかを描画するツールを調べた時に,Cartography を使う機会があったのでこの記事で試した内容をまとめていきます.
Cartography とは
Cartography はインフラストラクチャーとその関係を Neo4j データベースによるグラフ表示で集約するPythonツールです.サポートされているプラットフォームは次のとおりです.
- Amazon Web Services
- Google Cloud Platform
- Google GSuite
- Duo CRXcavator
- Jamf
- Okta
- Github
- DigitalOcean
- Microsoft Azure
- Kubernetes
- PagerDuty
- Crowdstrike Falcon
- NIST CVE
Cartography のセットアップ
セットアップはドキュメントを参考に進めました.Neo4j を動かすために JDK/JRE が 11以上のものを入れる必要があるのですが,オプションとして Amazon Coretto 11 を紹介されていたため,ドキュメントに沿って Amazon Corretto 11 を入れてみました.
$/usr/libexec/java_home --verbose
Matching Java Virtual Machines (1):
    11.0.17 (x86_64) "Amazon.com Inc." - "Amazon Corretto 11" /Library/Java/JavaVirtualMachines/amazon-corretto-11.jdk/Contents/Home
/Library/Java/JavaVirtualMachines/amazon-corretto-11.jdk/Contents/Home
次に,Neo4j のコミュニティエディションの 4.4 系のものを入れるのですが,この記事では 4.4.15 のものを入れたことにします.サーバーを起動するとローカル 7474番ポートで使えるようになりました.
$./bin/neo4j console
~中略~
Starting Neo4j.
2023-01-11 23:15:29.713+0000 INFO  Starting...
2023-01-11 23:15:30.371+0000 INFO  This instance is ServerId{ae9c3997} (ae9c3997-16b4-49ef-bc31-d9f9577e9795)
2023-01-11 23:15:31.915+0000 INFO  ======== Neo4j 4.4.15 ========
2023-01-11 23:15:33.978+0000 INFO  Performing postInitialization step for component 'security-users' with version 3 and status CURRENT
2023-01-11 23:15:33.979+0000 INFO  Updating the initial password in component 'security-users'
2023-01-11 23:16:00.295+0000 INFO  Bolt enabled on localhost:7687.
2023-01-11 23:16:01.387+0000 INFO  Remote interface available at http://localhost:7474/
2023-01-11 23:16:01.401+0000 INFO  id: 1A231D4D04203A4C6DA1D525A2297D3B807DFDCC9B40D94B25CC3631D57EE0CA
2023-01-11 23:16:01.402+0000 INFO  name: system
2023-01-11 23:16:01.402+0000 INFO  creationDate: 2022-12-21T05:43:28.235Z
2023-01-11 23:16:01.402+0000 INFO  Started.
そして,リポジトリをローカルに持ってきて,pip install cartography を実行して Cartographyをインストールします.なお,この記事ではバージョン3.9.6` で確認しています.インストール完了後,コマンドが実行できるようになります.
$cartography --help
usage: cartography [-h] [-v] [-q] [--neo4j-uri NEO4J_URI] [--neo4j-user NEO4J_USER] [--neo4j-password-env-var NEO4J_PASSWORD_ENV_VAR] [--neo4j-password-prompt]
                   [--neo4j-max-connection-lifetime NEO4J_MAX_CONNECTION_LIFETIME] [--neo4j-database NEO4J_DATABASE] [--update-tag UPDATE_TAG] [--aws-sync-all-profiles] [--aws-best-effort-mode]
                   [--oci-sync-all-profiles] [--azure-sync-all-subscriptions] [--azure-sp-auth] [--azure-tenant-id AZURE_TENANT_ID] [--azure-client-id AZURE_CLIENT_ID]
                   [--azure-client-secret-env-var AZURE_CLIENT_SECRET_ENV_VAR] [--aws-requested-syncs AWS_REQUESTED_SYNCS] [--crxcavator-api-base-uri CRXCAVATOR_API_BASE_URI]
                   [--crxcavator-api-key-env-var CRXCAVATOR_API_KEY_ENV_VAR] [--analysis-job-directory ANALYSIS_JOB_DIRECTORY] [--okta-org-id OKTA_ORG_ID] [--okta-api-key-env-var OKTA_API_KEY_ENV_VAR]
                   [--okta-saml-role-regex OKTA_SAML_ROLE_REGEX] [--github-config-env-var GITHUB_CONFIG_ENV_VAR] [--digitalocean-token-env-var DIGITALOCEAN_TOKEN_ENV_VAR]
                   [--permission-relationships-file PERMISSION_RELATIONSHIPS_FILE] [--jamf-base-uri JAMF_BASE_URI] [--jamf-user JAMF_USER] [--jamf-password-env-var JAMF_PASSWORD_ENV_VAR]
                   [--k8s-kubeconfig K8S_KUBECONFIG] [--nist-cve-url NIST_CVE_URL] [--cve-enabled] [--statsd-enabled] [--statsd-prefix STATSD_PREFIX] [--statsd-host STATSD_HOST]
                   [--statsd-port STATSD_PORT] [--pagerduty-api-key-env-var PAGERDUTY_API_KEY_ENV_VAR] [--pagerduty-request-timeout PAGERDUTY_REQUEST_TIMEOUT]
                   [--crowdstrike-client-id-env-var CROWDSTRIKE_CLIENT_ID_ENV_VAR] [--crowdstrike-client-secret-env-var CROWDSTRIKE_CLIENT_SECRET_ENV_VAR] [--crowdstrike-api-url CROWDSTRIKE_API_URL]

cartography consolidates infrastructure assets and the relationships between them in an intuitive graph view. This application can be used to pull configuration data from multiple sources, load it in to
Neo4j, and run arbitrary enrichment and analysis on that data. Please make sure you have Neo4j running and have configured AWS credentials with the SecurityAudit IAM policy before getting started.
Running cartography with no parameters will execute a simple sync against a Neo4j instance running locally. It will use your default AWS credentials and will not execute and post-sync analysis jobs.
Please see the per-parameter documentation below for information on how to connect to different Neo4j instances, use auth when communicating with Neo4j, sync data from multiple AWS accounts, and execute
arbitrary analysis jobs after the conclusion of the sync.

optional arguments:
  -h, --help            show this help message and exit
  -v, --verbose         Enable verbose logging for cartography.
  -q, --quiet           Restrict cartography logging to warnings and errors only.
  --neo4j-uri NEO4J_URI
                        A valid Neo4j URI to sync against. See https://neo4j.com/docs/api/python-driver/current/driver.html#uri for complete documentation on the structure of a Neo4j URI.
  --neo4j-user NEO4J_USER
                        A username with which to authenticate to Neo4j.
  --neo4j-password-env-var NEO4J_PASSWORD_ENV_VAR
                        The name of an environment variable containing a password with which to authenticate to Neo4j.
  --neo4j-password-prompt
                        Present an interactive prompt for a password with which to authenticate to Neo4j. This parameter supersedes other methods of supplying a Neo4j password.
  --neo4j-max-connection-lifetime NEO4J_MAX_CONNECTION_LIFETIME
                        Time in seconds for the Neo4j driver to consider a TCP connection alive. cartography default = 3600, which is the same as the Neo4j driver default. See
                        https://neo4j.com/docs/driver-manual/1.7/client-applications/#driver-config-connection-pool-management.
  --neo4j-database NEO4J_DATABASE
                        The name of the database in Neo4j to connect to. If not specified, uses the config settings of your Neo4j database itself to infer which database is set to default. See
                        https://neo4j.com/docs/api/python-driver/4.4/api.html#database.
  --update-tag UPDATE_TAG
                        A unique tag to apply to all Neo4j nodes and relationships created or updated during the sync run. This tag is used by cleanup jobs to identify nodes and relationships that are
                        stale and need to be removed from the graph. By default, cartography will use a UNIX timestamp as the update tag.
  --aws-sync-all-profiles
                        Enable AWS sync for all discovered named profiles. When this parameter is supplied cartography will discover all configured AWS named profiles (see
                        https://docs.aws.amazon.com/cli/latest/userguide/cli-configure-profiles.html) and run the AWS sync job for each profile not named "default". If this parameter is not supplied,
                        cartography will use the default AWS credentials available in your environment to run the AWS sync once. When using this parameter it is suggested that you create an AWS config
                        file containing a named profile for each AWS account you want to sync and use the AWS_CONFIG_FILE environment variable to point to that config file (see
                        https://docs.aws.amazon.com/cli/latest/userguide/cli-configure-envvars.html). cartography respects the AWS CLI/SDK environment variables and does not override them.
  --aws-best-effort-mode
                        Enable AWS sync best effort mode when syncing AWS accounts. This will allow cartography to continue syncing other accounts and delay raising an exception until the very end.
  --oci-sync-all-profiles
                        Enable OCI sync for all discovered named profiles. When this parameter is supplied cartography will discover all configured OCI named profiles (see https://docs.oracle.com/en-
                        us/iaas/Content/API/Concepts/sdkconfig.htm) and run the OCI sync job for each profile not named "DEFAULT". If this parameter is not supplied, cartography will use the default OCI
                        credentials available in your environment to run the OCI sync once.
  --azure-sync-all-subscriptions
                        Enable Azure sync for all discovered subscriptions. When this parameter is supplied cartography will discover all configured Azure subscriptions.
  --azure-sp-auth       Use Service Principal authentication for Azure sync.
  --azure-tenant-id AZURE_TENANT_ID
                        Azure Tenant Id for Service Principal Authentication.
  --azure-client-id AZURE_CLIENT_ID
                        Azure Client Id for Service Principal Authentication.
  --azure-client-secret-env-var AZURE_CLIENT_SECRET_ENV_VAR
                        The name of environment variable containing Azure Client Secret for Service Principal Authentication.
  --aws-requested-syncs AWS_REQUESTED_SYNCS
                        Comma-separated list of AWS resources to sync. Example 1: "ecr,s3,ec2:instance" for ECR, S3, and all EC2 instance resources. See the full list available in source code at
                        cartography.intel.aws.resources. If not specified, cartography by default will run all AWS sync modules available.
  --crxcavator-api-base-uri CRXCAVATOR_API_BASE_URI
                        Base URI for the CRXcavator API. Defaults to public API endpoint.
  --crxcavator-api-key-env-var CRXCAVATOR_API_KEY_ENV_VAR
                        The name of an environment variable containing a key with which to auth to the CRXcavator API. Required if you are using the CRXcavator intel module. Ignored otherwise.
  --analysis-job-directory ANALYSIS_JOB_DIRECTORY
                        A path to a directory containing analysis jobs to run at the conclusion of the sync. cartography will discover all JSON files in the given directory (and its subdirectories) and
                        pass them to the GraphJob API to execute against the graph. This allows you to apply data transformation and augmentation at the end of a sync run without writing code.
                        cartography does not guarantee the order in which the jobs are executed.
  --okta-org-id OKTA_ORG_ID
                        Okta organizational id to sync. Required if you are using the Okta intel module. Ignored otherwise.
  --okta-api-key-env-var OKTA_API_KEY_ENV_VAR
                        The name of an environment variable containing a key with which to auth to the Okta API.Required if you are using the Okta intel module. Ignored otherwise.
  --okta-saml-role-regex OKTA_SAML_ROLE_REGEX
                        The regex used to map Okta groups to AWS roles when using okta as a SAML provider.The regex is the one entered in Step 5: Enabling Group Based Role Mapping in Oktahttps://saml-
                        doc.okta.com/SAML_Docs/How-to-Configure-SAML-2.0-for-Amazon-Web-Service#c-step5The regex must contain the {{role}} and {{accountid}} tags
  --github-config-env-var GITHUB_CONFIG_ENV_VAR
                        The name of an environment variable containing a Base64 encoded GitHub config object.Required if you are using the GitHub intel module. Ignored otherwise.
  --digitalocean-token-env-var DIGITALOCEAN_TOKEN_ENV_VAR
                        The name of an environment variable containing a DigitalOcean access token.Required if you are using the DigitalOcean intel module. Ignored otherwise.
  --permission-relationships-file PERMISSION_RELATIONSHIPS_FILE
                        The path to the permission relationships mapping file.If omitted the default permission relationships will be created
  --jamf-base-uri JAMF_BASE_URI
                        Your Jamf base URI, e.g. https://hostname.com/JSSResource.Required if you are using the Jamf intel module. Ignored otherwise.
  --jamf-user JAMF_USER
                        A username with which to authenticate to Jamf.
  --jamf-password-env-var JAMF_PASSWORD_ENV_VAR
                        The name of an environment variable containing a password with which to authenticate to Jamf.
  --k8s-kubeconfig K8S_KUBECONFIG
                        The path to kubeconfig file specifying context to access K8s cluster(s).
  --nist-cve-url NIST_CVE_URL
                        The base url for the NIST CVE data. Default = https://nvd.nist.gov/feeds/json/cve/1.1
  --cve-enabled         If set, CVE data will be synced from NIST.
  --statsd-enabled      If set, enables sending metrics using statsd to a server of your choice.
  --statsd-prefix STATSD_PREFIX
                        The string to prefix statsd metrics with. Only used if --statsd-enabled is on. Default = empty string.
  --statsd-host STATSD_HOST
                        The IP address of your statsd server. Only used if --statsd-enabled is on. Default = 127.0.0.1.
  --statsd-port STATSD_PORT
                        The port of your statsd server. Only used if --statsd-enabled is on. Default = UDP 8125.
  --pagerduty-api-key-env-var PAGERDUTY_API_KEY_ENV_VAR
                        The name of environment variable containing the pagerduty API key for authentication.
  --pagerduty-request-timeout PAGERDUTY_REQUEST_TIMEOUT
                        Seconds to timeout for pagerduty API sessions.
  --crowdstrike-client-id-env-var CROWDSTRIKE_CLIENT_ID_ENV_VAR
                        The name of environment variable containing the crowdstrike client id for authentication.
  --crowdstrike-client-secret-env-var CROWDSTRIKE_CLIENT_SECRET_ENV_VAR
                        The name of environment variable containing the crowdstrike secret key for authentication.
  --crowdstrike-api-url CROWDSTRIKE_API_URL
                        The crowdstrike URL, if using self-hosted. Defaults to the public crowdstrike API URL otherwise.

For more documentation please visit: https://github.com/lyft/cartography
Cartography を使って AWS の関連図を描画する
Neo4j のローカルサーバーを起動した状態で,Cartography のコマンドを実行していくのですが,Neo4j の初回起動ユーザーとパスワードをパラメータにセットして default クレデンシャルでセットされた AWS アカウントの構成情報を収集して Neo4j サーバーに投入してくれます.
$ cartography --neo4j-user neo4j --neo4j-password-prompt --neo4j-uri bolt://localhost:7687
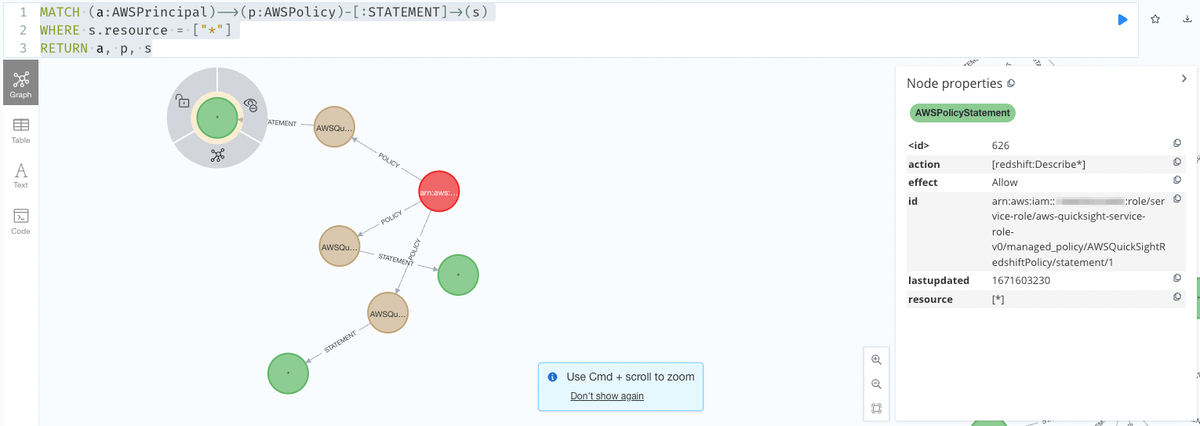
次に,収集したデータに対してクエリを実行してみます.IAM ポリシーでワイルドカードを使っている IAMロールの描画をしてみます.
MATCH (a:AWSPrincipal)-->(p:AWSPolicy)-[:STATEMENT]->(s)
WHERE s.resource = ["*"]
RETURN a, p, s
IAMロールに紐付くポリシーとポリシーの中でワイルドカードが指定されている権限が表示されました.


関連情報
まとめ
Cartography を使ってみたので,インストールと試しにクエリを叩いて描画してみました.IAM のような大量のリソースが作られてて関連図がわかり易くするためのツールとして良さそうでした.